Monday, May 27, 2019

Raspberry Pi - Organization

I keep going to back to utilizing Raspberry Pi computers to introduce Python coding skills in my middle school technology class. Why do I pick the Raspberry Pi over web-based options that can be accessed on devices we already have out and ready to go? In my experience, it is easy for students to get lost and off task on other devices that are connected to the Internet. The Raspberry Pi, thus far, seems to keep students on the task at hand while providing a sense of novelty. Also, in each class, I have the students collect the needed pieces and connect up their Raspberry Pi. This is in order to reinforce the parts of the computer and provide authentic tech troubleshooting skills.

We only have enough resources for seven Raspberry Pi computers. Students are required to collaborate and be able to work with others in pairs or groups of three for each project. This is beneficial in helping the students through the new concepts and making them more comfortable with coding. By the end, my goal is that all students appreciate and have a basic understanding of coding. They should feel that coding is something doable.

How do I organize the components for the computers?
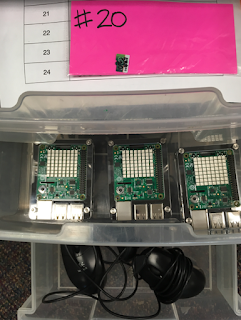
Monitors: Cords wrapped around screen and placed on shelf
Keyboards: Stacked on shelf
Mice: Stored in a drawer
Power Cord: Stored in a drawer
Raspberry Pi: Stored in a drawer

microSD cards: Cards are labeled with a number and placed in a bag labeled with the same number along with a piece of numbered card stock color coded by class. In the drawer is a sheet of paper which lists the classes and each group’s assigned microSD number.

Each group of students has their own microSD card, making it seem as if the computer was actually theirs. This cuts back on the potential issue of work disappearing between classes and allows students to take risks such as installing programs or changing settings as time allows.
Friday, April 19, 2019

Searching? Create your own Search Engine

We regularly send students to search the web for various reasons and items. Why not try to improve and narrow down their results to websites you trust? Create your own search engine! Preload it with only the sites you want students to review for the particular visit. This is beneficial, especially with younger students who are not as savvy at navigating their way through reliable sources and, at times, can get lost in space. Plus, you can make sure that there are sites available for each student’s topic.

Google Custom Search Engine
  • Use your Google account to save the search settings which can be edited/updated after it is first created
  • Enter in as many websites as you need to have available
  • Limit searching to an exact page, subset of pages, or an entire website
  • Set up one or multiple totally different searches depending on the topic or class
  • Remove ads after creating the initial search (school accounts are considered as nonprofit thus allowing ads to be turned off for free)
  • Share the final “public” link with your class on Schoology or use a URL shortener to make it easier to type in

Wednesday, February 27, 2019

Online Student Discussions

If your school has a learning management system, you most likely have access to some form of class discussion features. If not, there are several options out there to get a class or group discussion going. The first step is figuring out why you want to use online discussions and, then, the next part is determining how you and your students can use them effectively.

Ideas for using online discussions:
  • Debate a topic, provide different views – practice citing sources
  • Compare and contrast
  • Take on a character and write in that manner
  • Record orally or written conversations in a foreign language
  • Provide numerous examples
  • Continue classroom discussions
  • Combine multiple classes into one discussion
  • Support classroom assignments outside the school day
  • Brainstorming
  • Assign separately to student groups to facilitate communication
  • Physical Education Example Uses for Schoology or FlipGrid
  • Demonstrate digital citizenship
    Practice online etiquette and how to respond to one another
  • Create a writing journal between teacher and student
  • Build a portfolio by assigning discussions individually
  • 6 Blended Learning Examples For Online Discussions

Here are two options for taking discussions online: Schoology and Flipgrid

Schoology Discussion Feature – Responses can be written, images, files, or recorded video/audio from within the editor. Create one for the class, one for each student (could even act as a mini portfolio), or even share one discussion with multiple classes. Grading can be done right in the discussion itself if desired.

Flipgrid – A free website where responses are all completed in a video or audio format. Students can participate using a computer web browser or the free iPad app. Grids can be protected by letting only those with our school email addresses to access them along with the requirement to have the special code to join. Here is a resource on How to Use Flipgrid – From Sign-up to Video Sharing.

Thursday, December 20, 2018

Password Managing

Ever forget a password or just not have it with you? And we know it isn’t safe to be using sticky notes or leaving usernames and passwords out and about. Everything we do in this day and age calls for more logins and passwords…passwords that need to be secure and vary from site to site. What can you do? Save them digitally!

Options

Google Chrome Passwords – Ever notice how Chrome asks you if you want to save your password? These are stored within Chrome itself. If you actually log in to Chrome and see your little profile picture across from the address bar, you can have the passwords sync to the cloud, thus making them accessible on other devices you log in to and safe if anything were to happen to your computer. You can also look up the password you entered on a site in case you need to enter it on another device. (Free)
  • Viewing saved passwords: When in Chrome, click the 3 dots on the upper right, choose
  • Turning Sync on: At the top right, click the gray person icon. Click the blue button to turn sync on and log in.
Safari – This browser will also ask you if you want to save passwords. These would be stored directly on your laptop and not necessarily backed up. (Free)
  • Viewing saved passwords: When in Safari, click Safari at the top left, choose Preferences, and click the tab for Passwords. Before you can see anything, it will prompt you to enter your laptop password as an extra layer of security.
iCloud Keychain – This feature available on Apple products will let you sync your passwords saved in Safari to other Apple devices. In general, it is a very basic way to back up passwords which is done through the use of your own Apple ID. (Free)
  • Turning on iCloud Keychain: In the upper right, click the apple and go to System Preferences. Click into the iCloud section. You will need to be logged into iCloud for this to be an option, so log in using your personal Apple ID. Click the box to enable Keychain and follow the prompts.
LastPass – Web-based password manager. There is a free version as well as a paid option. Just create one account on the website (you will need to remember this login and password though) to be able to save all your passwords. This works across different platforms and devices. There are a variety of options to install and access LastPass on your devices to make logging in to sites easier and faster. (Free and paid versions. The free version should be sufficient.)

Wednesday, March 21, 2018

Making: Soldering

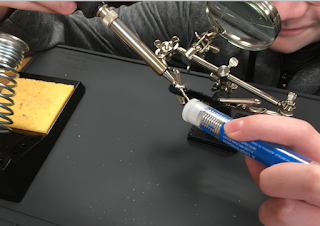
Soldering finally happened! I provided my middle schoolers with the opportunity to learn how to solder electronics. The majority of the students had never soldered before, but there were a few rock stars that were more than happy to share their knowledge with the rest of the class. The intro lesson reviewed how circuits worked – especially polarity, how to solder, and general safety. Our first project was Learn to Solder: Circuits with LED and Pipe Cleaners. This was a nice starting point that only required four solder points and allowed for certain success. If I do this particular project again, I would find a way or have the students find a way to incorporate a switch so that the LED can be turned off without needing to remove the battery. Following this first project, we proceeded to practice soldering on little electronic soldering kits and learning about the different components.

Tips:
    making soldering
  • If you are going to have students solder random wire, test soldering the wires together before leading the lesson. Not all wire or metals will work. For example, paperclips and ever so slightly coated wire will not allow the solder to fuse. (I attended a training where the instructors had not fully tested out the lesson before teaching it.)
  • Find or create a video to demonstrate how to solder since it can be difficult for an entire class to crowd around to see the process up close.


Tuesday, January 23, 2018

Classroom STEAM Challenges: Bubble Wands

My year started out with this fun and engaging STEAM challenge while the weather was still wonderful – and it will be again! The challenge was set up with a story about how I had been at a state fair and observed a lady selling her personally crafted bubble wands and proprietary bubble solution. I was confident that my class could design their own wands and discover the best homemade bubble solution recipe on their own. Below is the general lesson plan this challenge activity followed which could easily be adapted to another multiday challenge topic.

Day 1
Planning: Research options and determine the necessary materials. Students completed a planning worksheet with a drawing of the wand, a materials list, and the exact bubble solution recipe to try. As a class, we compared recipes and picked three unique ones to try (within reason). Preplanning provided the opportunity to remind students what materials are reasonably expected to be available in class versus what a student might want to bring from home for the next class period. The planning step of this challenge was also necessary from the teacher standpoint to know what items needed to be made available and the associated quantities. For example, dowel rods could easily be required, but how many, or what are the necessary lengths to purchase?

Day 2
Creating: Students had 20-25 minutes to assemble their bubble wands and mix up the desired bubble solutions.
Testing and Problem Solving: Outside, the wands and solutions were tested. Students needed to compare the usability of the different solutions with their wands. There was a clear winner when it came to the recipes. Extra materials were made available while outside to aid in problem solving and success of their wands and experiences.
Reflection and Debrief: As a class, we made determinations as to which wands and solutions worked the best. Why did some work better? How could wands be improved? What did we do when our plans didn’t work as expected?

Day 3 (optional)
Modifying: Students had 20-25 minutes to modify and improve their bubble wands. Either they upgraded their previous design or completely started over based on their new-found knowledge.
Testing: Outside, round two of testing the upgraded wands and solutions.
Reflection and Debrief: We engaged in a class discussion of the findings and the experience as a whole. Students completed an individual written reflection on the challenge to round out the experience.

See my other post Classroom STEAM Challenges for more challenge ideas.

Friday, December 1, 2017

Classroom STEAM Challenges

Use STEAM challenge cards/activities with your classroom curriculum to practice problem solving skills utilizing the STEAM concepts.

Why

Not every challenge covers all of these objectives. As a teacher, you can decide which ones and how many to focus on.

Planning
     •       Finding out if it is necessary or helpful to plan ahead
     •       Looking at different methods of planning
Collaboration / Team Work / Communication
     •       Practicing listening by allowing others to speak
     •       Testing out if comments that are too positive or too negative hinder brainstorming
     •       Trying out different roles such as Captain, Maker, Architect, Tester, Reporter
Resourcefulness
     •       Working with limited items
     •       Not wasting or destroying materials without purpose
Creativity
     •       See items in different lights
     •       Pretending
Problem Solving
     •       Analyze the pieces and any clues
     •       Getting desired results
     •       Dealing with design failures
Reflection
     •       Reviewing as an individual, group, and/or class
     •       Learning from mistakes and celebrating successes
Short Duration
     •       Introducing a new topic or unit
     •       Assessing prior knowledge
     •       Mixing things up with a change of pace
     •       Providing self-guided centers
Time management
     •       Paying attention to overall time and pacing
     •       Accomplishing goals within time limits

Ideas Adaptable for any Subject


       4 Engineering Challenges - cups, popsicle sticks, wooden cubes
       Challenge Box Cards (found at bottom of the page)
       Student Role Sheets (readable, printable version)


Make a Tall Hat (JK/K) - paper, scissors, tape; could be used as a pretest of fine motor skills such as using scissors to cut paper, ability to stay on task

Make something that is 3D (K/1/2) - paper, scissors, tape

Lego Builds
     Could be simple challenges such as making a particular shape, a face, or a house.

Build with Pasta - pasta and hot glue, can use gluten free pasta; for example, after learning about ferris wheels, students needed to design their own

Marshmallow Challenge - marshmallows, spaghetti

Cardboard Challenge - open ended or funnel it into a topic with a specific goal

Challenges as optional at home projects - for reference if you want to take this type of approach or use one of their ideas